

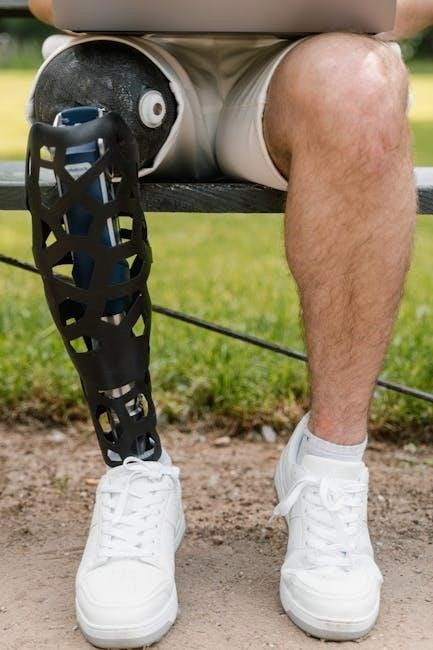
Ortho-Glass splinting represents a modern advancement in immobilization techniques, offering a lightweight and durable alternative to traditional plaster casts.
This manual serves as a comprehensive guide, detailing the application and benefits of utilizing Ortho-Glass for various orthopedic injuries, ensuring optimal patient care.
Prefabricated splints, like Ortho-Glass, are readily available and simplify the splinting process, providing clinicians with a reliable and efficient solution.
What is Ortho-Glass?
Ortho-Glass is a prefabricated splinting material composed of layers of fiberglass encased within a polypropylene padding. This innovative design provides exceptional strength and rigidity while remaining significantly lighter than traditional plaster casts.
Unlike plaster, Ortho-Glass doesn’t require mixing, minimizing preparation time and mess. It’s readily available in various widths – typically 3-, 4-, and 5-inch rolls – to accommodate different limb sizes and injury locations.
The fiberglass construction allows for excellent moldability when activated with water, conforming precisely to the contours of the patient’s limb. This precise fit enhances immobilization and comfort. Furthermore, Ortho-Glass is breathable and allows for some degree of skin ventilation, reducing the risk of skin irritation compared to fully enclosed casts.
Its water-activated resin allows for a strong, durable, and lightweight splint, making it a preferred choice for many orthopedic professionals. Detailed instructions for proper activation and application are found within the Ortho-Glass splinting manual.
Benefits of Using Ortho-Glass Splints
Ortho-Glass splints offer numerous advantages over traditional casting materials. Their lightweight nature significantly improves patient comfort, particularly for children and individuals with limited mobility. The reduced weight also minimizes fatigue and strain on the affected limb.
Compared to plaster, Ortho-Glass boasts superior strength-to-weight ratio, providing robust immobilization without excessive bulk. It’s also breathable, allowing for better air circulation and reducing the likelihood of skin maceration and irritation.
The water-activation process is quick and straightforward, simplifying application and reducing clinic time. Ortho-Glass splints are radiolucent, meaning they don’t interfere with X-ray imaging, allowing for easy monitoring of fracture healing.
Furthermore, removal is simpler and cleaner than plaster casts, typically requiring only a cast saw to cut through the material, as detailed in the Ortho-Glass splinting manual. This ease of removal minimizes patient discomfort and potential skin damage.

Materials Required for Ortho-Glass Splinting

Successful Ortho-Glass application demands specific supplies: fiberglass rolls, stockinette, elastic bandages (Ace wraps), cool water, and adhesive tape for secure fixation.
Ortho-Glass Splint Rolls: Sizes and Specifications
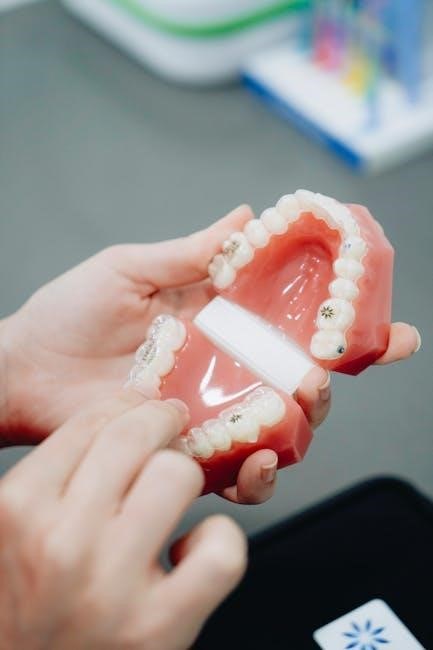
Ortho-Glass splint rolls are prefabricated devices composed of layers of fiberglass encased within a soft, polypropylene padding. These rolls are designed to provide rigid support while remaining lightweight and breathable. Commonly, they are available in three primary widths to accommodate varying limb sizes and injury locations.
The standard sizes include 3-inch, 4-inch, and 5-inch widths. The 3-inch roll is ideal for smaller extremities like fingers or wrists, offering precise immobilization. The 4-inch roll serves as a versatile option for wrists, hands, and smaller sections of forearms. Finally, the 5-inch roll is best suited for larger areas, such as forearms, legs, or ankles, providing comprehensive support.
Each roll typically measures approximately 14 feet in length, providing ample material for most splinting applications. It’s crucial to select the appropriate width based on the patient’s anatomy and the extent of the injury to ensure optimal comfort and effective immobilization. Always check the packaging for specific product specifications and expiration dates.
Stockinette Application
Stockinette serves as a crucial interface between the patient’s skin and the Ortho-Glass splint, providing cushioning and preventing direct contact with the rigid material. It’s typically made of a soft, cotton blend and is available in various sizes to fit different limb circumferences;
To apply the stockinette, begin by selecting a size slightly larger than the circumference of the limb to be splinted. Gently roll the stockinette over the affected area, ensuring it extends beyond the intended splint boundaries by at least two inches at each end. This extension allows for folding over the Ortho-Glass, creating a smooth, secure edge.
Avoid wrinkles or bunching, as these can cause pressure points and skin irritation. Ensure the stockinette is applied smoothly and evenly. Once in place, carefully fold the excess stockinette over the edges of the applied Ortho-Glass splint, securing it with elastic bandages.
Elastic Bandages (Ace Wraps)
Elastic bandages, commonly known as Ace wraps, play a vital role in securing the Ortho-Glass splint and providing controlled compression to the injured limb. They help maintain the splint’s position, minimize swelling, and offer support during the healing process.
When applying elastic bandages, begin distally and wrap proximally, overlapping each layer by approximately half its width. Maintain consistent tension throughout the wrapping process, avoiding excessive tightness that could compromise circulation. Monitor the patient’s fingers or toes for any signs of discoloration or numbness.
Ensure the elastic bandage encompasses both the stockinette and the Ortho-Glass splint, effectively holding them together. Continue wrapping until the entire splint is securely fastened. Regularly assess the bandage for any looseness and readjust as needed. Proper application is key to optimal support and comfort.
Water Activation Process
The Ortho-Glass splint’s unique properties are activated through a simple water immersion process. Submerge the splint roll completely in cool, clean water for approximately 5-10 seconds, or until bubbling ceases. This indicates that the resin within the fiberglass layers has been fully saturated.
Avoid using warm or hot water, as it can accelerate the setting process and reduce working time. Once activated, the splint becomes pliable and moldable, conforming to the contours of the patient’s limb. Work quickly, as the splint will begin to harden within a few minutes.
Excess water should be gently squeezed out before application, but avoid excessive manipulation that could compromise the structural integrity. Remember, prefabricated splints such as Ortho-Glass should not be re-activated once initially wetted.

Step-by-Step Ortho-Glass Splinting Technique
Ortho-Glass application involves precise steps: limb preparation, stockinette application, splint application, and careful water activation followed by meticulous molding for optimal immobilization.
Preparing the Limb
Prior to applying any splinting material, thorough limb preparation is crucial for both patient comfort and optimal splint effectiveness. Begin by carefully assessing the injured area, noting any open wounds, neurovascular compromise, or significant swelling.
If open wounds are present, appropriate wound care, including cleansing and dressing, must be performed before proceeding. Gently clean the skin surrounding the injury with a mild soap and water, ensuring all debris is removed.
Padding is essential, especially over bony prominences, to prevent skin breakdown and pressure sores. Utilize soft padding materials, such as cotton padding or felt, to create a protective layer between the limb and the splint.
Ensure the limb is in a neutral and functional position, as this is the position in which the splint will maintain immobilization. Avoid excessive manipulation or movement of the injured area during preparation.
Applying the Stockinette
The stockinette serves as a crucial interface between the patient’s skin and the rigid splinting material, providing cushioning and preventing direct contact. Select a stockinette size appropriate for the limb circumference, ensuring it extends beyond the intended splint boundaries by at least two inches at both ends.
Begin by carefully applying the stockinette, gently rolling it over the limb, avoiding any wrinkles or bunching. Ensure a smooth, even distribution to maximize comfort and prevent pressure points.
Once applied, fold the excess stockinette over the ends of the Ortho-Glass splint, securing it in place. This creates a soft, padded edge that minimizes the risk of skin irritation or abrasion.
Avoid excessive tension during application, as this can compromise circulation. Regularly assess the patient’s feedback regarding comfort and sensation throughout the process.
Applying the Ortho-Glass Splint
With the stockinette properly in place, carefully unroll the Ortho-Glass splint roll, positioning it along the length of the prepared limb. Begin applying the splint, overlapping each layer by approximately one-half to two-thirds of its width, ensuring consistent support and rigidity.
Maintain gentle, even pressure during application to conform the splint to the limb’s contours. Avoid creating excessive tension or constricting movement. The number of layers applied will depend on the severity of the injury and the desired level of immobilization.
Pay close attention to anatomical landmarks, ensuring proper alignment and support. Secure the initial layers with elastic bandages (Ace wraps) to maintain position before proceeding with water activation.
Remember to avoid wrinkles or creases within the Ortho-Glass layers, as these can create pressure points and compromise patient comfort.
Water Activation and Molding
Once the Ortho-Glass splint is applied and secured with elastic bandages, initiate the water activation process. Submerge the splint in cool, clean water, ensuring complete saturation of the fiberglass material. Observe for bubbling, which indicates the resin is activating – continue soaking until bubbling ceases.
Carefully remove the splint from the water and gently squeeze out any excess moisture. Utilizing gloved hands, begin molding the splint to the precise contours of the limb, providing anatomical support and immobilization.
Apply firm, even pressure to shape the splint, paying attention to bony prominences and joint positions. Avoid excessive force that could cause skin compression or discomfort. The splint will rapidly harden as it dries, maintaining the molded shape.
Ensure the splint provides adequate support without restricting circulation. Monitor the patient for any signs of discomfort or neurovascular compromise during and after the molding process.

Specific Applications of Ortho-Glass Splints
Ortho-Glass splints excel in diverse scenarios, including wrist, finger, and forearm immobilization, offering customizable support for fractures, sprains, and soft tissue injuries.
Wrist Splinting
Wrist splinting with Ortho-Glass is commonly employed for conditions like carpal tunnel syndrome, sprains, and stable wrist fractures. Begin by applying a stockinette extending beyond the forearm, ensuring adequate padding.
Apply two to three layers of Ortho-Glass, overlapping each layer by approximately one-half its width, conforming to the wrist’s natural curvature. Activate the splint with water, carefully molding it to provide firm, yet comfortable, support.
Maintain the wrist in a neutral or slightly extended position during molding. Secure with elastic bandages, ensuring even pressure distribution without constricting circulation. Regularly assess for signs of compartment syndrome, such as pain, swelling, and numbness. Proper application and monitoring are crucial for effective wrist immobilization and patient comfort.
Finger Splinting
Finger splinting utilizing Ortho-Glass is ideal for treating fractures, dislocations, and soft tissue injuries. Begin by applying a stockinette to the affected finger, extending beyond the metacarpal head for secure anchoring.
Cut a strip of Ortho-Glass to the appropriate length and width, carefully applying it along the dorsal aspect of the finger. Activate the splint with water, meticulously molding it to conform to the finger’s anatomy, ensuring proper alignment.
Consider buddy taping adjacent fingers for added stability, using soft padding to prevent skin irritation. Secure with elastic tape, avoiding excessive tightness that could compromise circulation. Regularly monitor for signs of neurovascular compromise, and educate the patient on proper care and potential complications.
Forearm Splinting
Forearm splinting with Ortho-Glass effectively immobilizes fractures, sprains, and tendon injuries. Begin by applying a stockinette extending from the mid-arm to the hand, ensuring adequate coverage.
Apply a generous layer of padding, particularly over bony prominences, to prevent pressure sores. Cut Ortho-Glass to the required length and width, conforming to the forearm’s shape. Activate the splint with water, carefully molding it to provide optimal support and maintain a neutral position.
Secure the splint with elastic bandages, ensuring even pressure distribution. Monitor for signs of compartment syndrome, including pain, swelling, and paresthesia. Patient education regarding splint care, activity modification, and follow-up appointments is crucial for successful healing.
Important Considerations and Precautions
Carefully monitor patients for skin irritation, compartment syndrome, and ensure proper removal techniques to avoid complications during Ortho-Glass splinting.
Avoiding Skin Irritation
Skin integrity is paramount when applying Ortho-Glass splints. Prior to application, thoroughly assess the patient’s skin for any existing abrasions, open wounds, or areas of sensitivity. Utilize a well-fitting stockinette to create a smooth interface between the skin and the splinting material, minimizing direct contact and friction.

Ensure the stockinette is wrinkle-free and extends beyond the intended splint boundaries. Avoid overly tight application of the elastic bandage, as this can restrict circulation and contribute to skin breakdown. Regularly inspect the skin beneath the splint for signs of redness, blistering, or maceration.
Educate patients on the importance of keeping the splint dry and avoiding scratching underneath it. If any signs of skin irritation develop, prompt removal and reassessment are crucial. Consider using padding materials in areas prone to pressure or friction to further protect the skin.
Monitoring for Compartment Syndrome
Compartment syndrome is a serious complication following immobilization, requiring vigilant monitoring. Instruct patients to immediately report any escalating pain, particularly pain out of proportion to the injury, or a burning sensation within the splinted limb.
Regularly assess the “five P’s”: pain, pallor, paresthesia (numbness or tingling), pulselessness, and poikilothermia (coolness). While pulselessness is a late sign, the others warrant immediate attention. Assess capillary refill time and sensation in the fingers or toes.
Document these assessments meticulously. Any suspicion of compartment syndrome necessitates prompt removal of the splint and consultation with a physician. Early recognition and intervention are critical to prevent irreversible muscle and nerve damage.
Patient education regarding these warning signs is essential for timely reporting and appropriate medical management.
Proper Splint Removal Techniques
Splint removal requires careful technique to avoid injury. Utilize a cast saw with a side-cutting blade, employing a slow and controlled motion. Avoid pressing down firmly, as this can cause skin damage. Instead, use a “rocking” motion to cut through the Ortho-Glass material.
Begin by cutting the stockinette and elastic bandages first. Then, carefully cut along the length of the Ortho-Glass splint, avoiding the underlying skin. Once split, gently pry the splint open, removing it in sections.
Inspect the skin for any signs of irritation, pressure sores, or breakdown. Following removal, assess neurovascular status, checking for sensation, movement, and pulse. Provide the patient with wound care instructions if necessary, and document the procedure thoroughly.
Always prioritize patient comfort and safety during splint removal.

Resources and Further Learning
Ortho-Glass splinting manuals (PDF format) and online demonstration videos are readily available for comprehensive training and skill enhancement.
These resources offer detailed guidance, ensuring proficient application and optimal patient outcomes.
Ortho-Glass Splinting Manuals (PDF)
Comprehensive guides in PDF format are invaluable resources for mastering Ortho-Glass splinting techniques. These manuals typically provide a detailed overview of the material’s properties, including its fiberglass composition and polypropylene padding layers, as highlighted in various clinical resources.
You’ll find step-by-step instructions covering limb preparation, stockinette application, and the crucial water activation process – ensuring the splint properly molds to the patient’s anatomy.
These manuals often include visual aids, such as diagrams and photographs, to illustrate correct application methods. They also address important considerations like avoiding skin irritation and monitoring for potential complications, such as compartment syndrome.
Furthermore, many manuals offer guidance on proper splint removal techniques, ensuring patient comfort and safety. Searching online for “Ortho-Glass splinting manual PDF” will yield several options from manufacturers and healthcare institutions.
Online Demonstration Videos
Visual learning is significantly enhanced through online demonstration videos focusing on Ortho-Glass splinting. Platforms like YouTube host numerous tutorials showcasing the entire process, from initial limb preparation to final molding and bandage application.
These videos often feature experienced healthcare professionals demonstrating correct techniques, emphasizing key steps like proper stockinette application and ensuring complete water saturation of the splint material.
Searching for “Ortho-Glass splinting tutorial” or “splinting basics Ortho-Glass” will reveal a wealth of resources. Many videos, like those from Martha Roberts NP, provide clear, concise instructions and address potential pitfalls.
These visual aids complement PDF manuals by offering a dynamic, real-time perspective on the splinting procedure. They are particularly helpful for understanding the nuances of molding the splint to achieve optimal immobilization and patient comfort, reinforcing best practices.